Making S’mores Bars means melting chocolate and marshmallows into a sticky, gooey mess that sticks to your spatula and the pan edges. You’ll drag a spoon through warm, caramelized marshmallow and chocolate layers, watching it stretch and drip. It’s a messy process but satisfying to see everything come together.
The prep involves crushing graham crackers, melting butter, and spreading everything into a pan, which gets sticky quick. As it bakes, the marshmallows puff up and turn golden, filling your kitchen with a smoky, toasted marshmallow aroma that makes you want to dive right in.
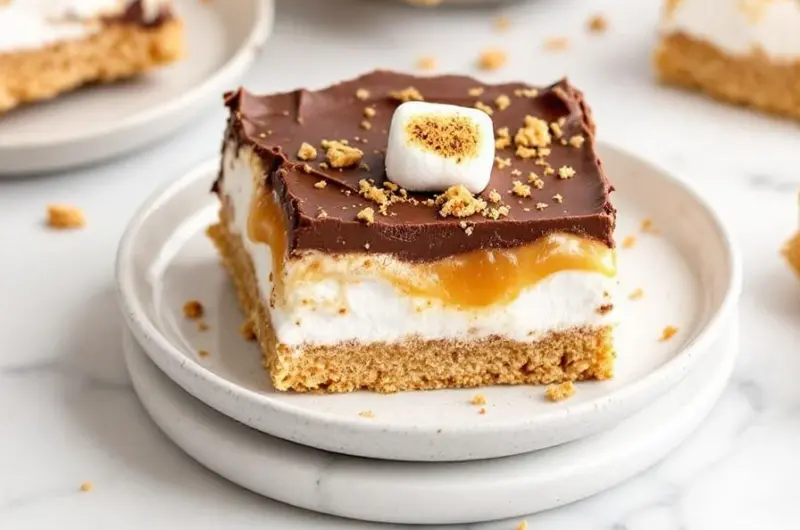
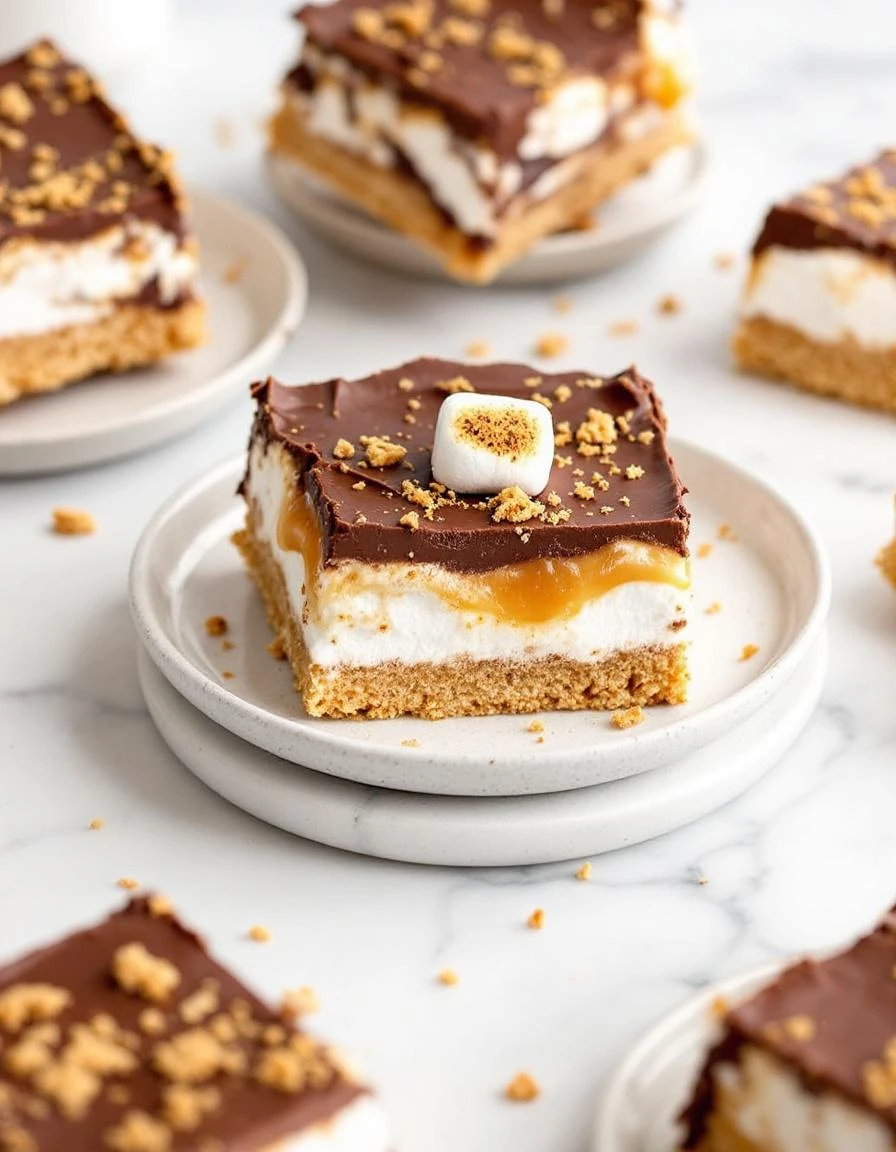
The sticky, gooey mess of melting marshmallows and chocolate that drips and sticks to everything as you cut into the bars.
What goes into this dish
- Graham crackers: I crush these into fine crumbs—skip the processor for a rustic feel or blitz in the blender. The nutty aroma with a hint of butter makes the crust feel cozy. Swap for digestive biscuits if you want a milder sweetness.
- Butter: Melts into the graham crumbs, creating a buttery, crisp base. Use unsalted butter for control, or coconut oil for a dairy-free version that adds a subtle tropical note. Keep it cold if you want a firmer crust.
- Chocolate chips: I prefer semi-sweet for depth, but milk chocolate makes it sweeter and more melty. Dark chocolate adds bitterness—great if you like your s’mores intense. Try a mix for complexity.
- Marshmallows: The gooey, toasted topping that turns golden and chewy. Use mini marshmallows for even coverage, or try large ones cut up for a more dramatic melt. Smoked marshmallows can add a surprising smoky kick.
- Vanilla extract: Just a splash enhances the richness of the chocolate and marshmallow. Or skip it for a more straightforward, vanilla-free marshmallow flavor. Adds a warm aroma that pulls everything together.
- Optional toppings: Crushed graham, chocolate drizzle, or a sprinkle of sea salt. These add texture and contrast. Use chopped nuts if you like crunch—pecans or almonds work well.
- Additional flavor: A pinch of cinnamon or espresso powder can deepen the flavor profile. Just a small amount—too much can overshadow the marshmallow sweetness.
S'mores Bars
Ingredients
Equipment
Method
- Preheat your oven to 350°F (175°C). In a mixing bowl, combine the graham cracker crumbs with melted butter until the mixture resembles damp sand. Press this mixture evenly into the bottom of your baking pan to form a crust.
- Bake the crust for about 8-10 minutes until set and fragrant, then remove it from the oven and set aside to cool slightly.
- In a microwave-safe bowl, melt the chocolate chips in 30-second bursts, stirring between each until smooth and glossy. Pour the melted chocolate over the cooled crust, spreading it evenly with a spatula.
- Sprinkle the mini marshmallows evenly over the chocolate layer, covering all the way to the edges.
- Bake the assembled bars for another 8-10 minutes, or until the marshmallows are puffed up and golden brown, filling your kitchen with a toasted marshmallow aroma.
- Remove the pan from the oven and allow the bars to cool completely at room temperature, or chill in the fridge for at least 2 hours to set firmly.
- Once cooled, cut into squares using a sharp knife. For cleaner cuts, wipe the knife clean between slices.
- Optionally, top with additional crushed graham crackers, a drizzle of melted chocolate, or a sprinkle of sea salt for added flavor and texture.
- Serve the gooey, sticky bars with a fork or your fingers, and enjoy the irresistible combination of crispy crust, melty chocolate, and toasted marshmallows.
Common S’mores Bar Mistakes & Fixes
- FORGOT to butter the pan: Causes sticking; fix with ample butter or parchment paper.
- DUMPED marshmallows in cold: They won’t melt evenly; use warm marshmallows for better stretchiness.
- OVER-TORCHED chocolate: Turns bitter and grainy; remove as soon as it melts smoothly.
- MISSED cooling time: Bars stay too soft; chill for at least 2 hours for clean slicing.
Make-Ahead and Storage Tips
- Prepare the crust and layer of chocolate and marshmallows a day ahead; keeps well covered in the fridge for up to 24 hours.
- Chill the baked bars overnight to set fully; this makes slicing easier and cleaner.
- Freezing is an option—wrap tightly and store for up to 2 months; thaw in the fridge before serving.
- Reheat slices in the microwave for 10-15 seconds until melty; check for gooeyness and warm aroma, not hot and burnt.
- Flavor intensifies with time, developing a richer, more caramelized marshmallow scent after a day in the fridge.
FAQs
1. How do I prevent marshmallow stickiness?
The marshmallows get sticky and gooey, especially when warm. The smell of toasted marshmallow fills the air when you bite in, making your tongue tingle with sweetness.
2. Why did my chocolate turn grainy?
Chocolate may seize or become grainy if overheated. Keep an eye on it as it melts, and stir gently until smooth, releasing a warm cocoa aroma.
3. My crust is soft, what now?
If the crust is too soft, it might need a longer bake or be chilled longer. A firm, buttery crunch should give way to a slight snap when you cut.
4. Can I make these ahead and reheat?
Refrigerate the bars overnight to let everything firm up and flavors meld. Reheat slices in the microwave just until warm and gooey, smelling the sweet, toasted marshmallow aroma.
5. Can I use different marshmallows?
Using mini marshmallows helps them melt evenly, creating a smooth, sticky top. For more smoky flavor, try smoked marshmallows or add a pinch of smoked sea salt on top.

Hi, I’m Isabella Cury, the creator behind Elevating Simple. Food has always been my passion, but it’s not just about creating meals—it’s about taking everyday ingredients and transforming them into something extraordinary.
My journey in the culinary world has been a blend of education, dedication, and a deep love for sharing food with others. Through this blog, I aim to inspire people to find joy in simple, flavorful cooking.


