Chocolate fondant often feels like a fancy, complicated dessert—something reserved for restaurants or special occasions. But honestly, it’s surprisingly simple to pull off at home, even on a busy weeknight. The secret is knowing how to get that perfect gooey center without overbaking, and once you do, it becomes a real game changer for everyday desserts.
What I love about this recipe is how forgiving it is once you get the hang of timing. It’s almost impulsive—mix, pour, bake, and suddenly you’ve got a warm, molten chocolate cake that’s rich and just a little bit messy in the best way. It’s quick to make, but the result feels like you’ve gone all out, turning an ordinary moment into something memorable.
Focusing on the surprising ease of achieving a perfectly gooey center, I want to show that chocolate fondant isn’t just for special occasions. It’s a quick, almost impulsive dessert that can turn a regular weeknight into something memorable, even if you’re rushing or not feeling perfect.
The Unexpected Simplicity of Molten Chocolate
- I love how a simple chocolate fondant can bring back childhood memories of my grandma’s kitchen, the smell of cocoa lingering in the air.
- There’s a chaotic joy in pulling these out of the oven—every time I wonder if I’ve overbaked or got the gooey center just right.
- I’ve had moments of pride when friends ask for the recipe, not knowing how quick and forgiving it really is.
- It’s a tiny act of rebellion to serve something so decadent from a weeknight pantry, almost like a secret weapon.
- The best part? That moment when you cut in and the molten chocolate flows out, pure silky chaos on the plate.
The story behind this recipe
This recipe for chocolate fondant came from a moment of wanting something quick but indulgent, a secret treat to make after a long day. I remember the first time I nailed that perfect gooey center—it felt like discovering a little magic in my own kitchen. Over the years, I’ve tweaked the timing and ingredients, but the core idea remains the same: dessert that’s rich, fast, and a little rebellious. It’s funny how a simple combination of chocolate and butter can turn into something so memorable, especially when served warm with a scoop of vanilla or a dusting of powdered sugar. That moment when you cut into it and molten chocolate flows out—nothing else quite compares.
Chocolate Fondant Trivia
- Chocolate fondant, also known as molten chocolate cake, was popularized in French patisseries in the late 20th century, becoming a symbol of indulgent dessert simplicity.
- The secret to its allure lies in the contrast between a firm exterior and a runny, gooey center—an effect achieved through precise baking times and ingredient ratios.
- Some culinary historians believe the first versions appeared accidentally when a cake was slightly underbaked, revealing the luscious molten core that became its signature.
- In France, chocolate fondant is often served with a dusting of powdered sugar or a scoop of vanilla ice cream, accentuating the rich, velvety chocolate experience.
- Despite its modern reputation, similar molten-centered desserts have roots in ancient Mediterranean recipes that combined fruit, nuts, and rich syrups.
Key Ingredients Breakdown
- Unsweetened chocolate: I love how it melts into a glossy, smoky paste that coats the tongue. For a milder flavor, swap with semi-sweet but don’t expect the same depth.
- Butter: I use good quality, European-style butter for richness and a slightly nutty aroma. Skipping or reducing can make the fondant less silky and more dense.
- Eggs: They’re the backbone of structure and gooey texture. Room temperature eggs whip up more easily and give a lift, so don’t skip that step.
- Sugar: Fine caster sugar dissolves smoothly, creating a sleek batter. Using raw sugar adds crunch, but sticks out too much in the finished cake.
- Flour: Just a touch for stability. Almond flour adds a subtle nutty note, while skipping it may make the cake overly fragile.
- Cocoa powder: Use high-quality, Dutch-processed for a rich, deep chocolate flavor. Natural cocoa will give a slightly more acidic tang, so adjust sugar accordingly.
- Optional extras: A splash of coffee or vanilla enhances depth. Smelling these as you mix is a good cue to the flavor profile developing.
Spotlight on key ingredients
Unsweetened chocolate:
- I love how it melts into a glossy, smoky paste that coats the tongue. For a milder flavor, swap with semi-sweet but don’t expect the same depth.
- Butter: I use good quality, European-style butter for richness and a slightly nutty aroma. Skipping or reducing can make the fondant less silky and more dense.
- Eggs: They’re the backbone of structure and gooey texture. Room temperature eggs whip up more easily and give a lift, so don’t skip that step.
Butter:
- I use good quality, European-style butter for richness and a slightly nutty aroma. Skipping or reducing can make the fondant less silky and more dense.
- Eggs: They’re the backbone of structure and gooey texture. Room temperature eggs whip up more easily and give a lift, so don’t skip that step.
Notes for ingredient swaps
- Dairy-Free: Swap butter with coconut oil or a neutral-tasting plant-based butter. The richness remains, but the flavor shifts slightly toward coconut or a milder note.
- Vegan: Use aquafaba or flaxseed eggs instead of eggs. The texture will be slightly different—less creamy but still gooey if baked right.
- Sweetener: Replace sugar with maple syrup or honey, reducing the quantity slightly. Expect a subtle floral or caramel note that enhances the chocolate.
- Chocolate: Substitute dark chocolate with semi-sweet or milk chocolate for a sweeter, less intense cocoa flavor. Adjust sugar accordingly.
- Gluten-Free: Use almond flour or gluten-free baking mix in place of all-purpose flour. The nutty or neutral profile adds a different layer of flavor.
- Cocoa Powder: Swap Dutch-processed cocoa for natural cocoa powder for a tangier, brighter chocolate taste. Reduce sugar slightly to balance acidity.
- Add-ins: Mix in chopped nuts, dried fruit, or a splash of liqueur to customize; just be mindful of moisture content and baking time.
Equipment & Tools
- Ramekins: To bake individual portions evenly and easily invert for presentation.
- Heatproof bowl: For melting chocolate and butter gently over simmering water.
- Whisk: To beat eggs and sugar until light and airy.
- Spatula: For folding ingredients gently to keep the batter airy.
- Fine sieve: To sift flour and cocoa powder smoothly into the batter.
- Oven: To bake the fondants at a precise temperature for perfect gooey centers.
Step-by-step Guide to Chocolate Fondant
- Preheat your oven to 200°C (390°F). Grease four ramekins with butter and dust with cocoa powder, tapping out excess.
- Melt 200g (7 oz) of good-quality dark chocolate and 150g (2/3 cup) of butter together in a heatproof bowl over simmering water, stirring until smooth. Let cool slightly.
- In a separate bowl, whisk 3 large eggs, 2 egg yolks, and 100g (1/2 cup) of sugar until pale and slightly thickened, about 2 minutes.
- Gradually pour the melted chocolate mixture into the eggs and sugar, folding gently with a spatula to combine. Be careful not to deflate the batter.
- Sift in 50g (1/3 cup) of all-purpose flour and 15g (2 tbsp) of cocoa powder. Fold gently until just combined, avoiding overmixing.
- Divide the batter evenly among the prepared ramekins. Smooth the tops with a spatula or the back of a spoon.
- Bake in the preheated oven for exactly 12-14 minutes. The edges should be set, but the center still jiggly when gently nudged.
- While baking, prepare a plate or a serving dish. Once out of the oven, let the fondants rest for 1-2 minutes to settle slightly.
- Run a thin knife around the edges of each ramekin to loosen. Carefully invert onto plates and lift off the ramekins.
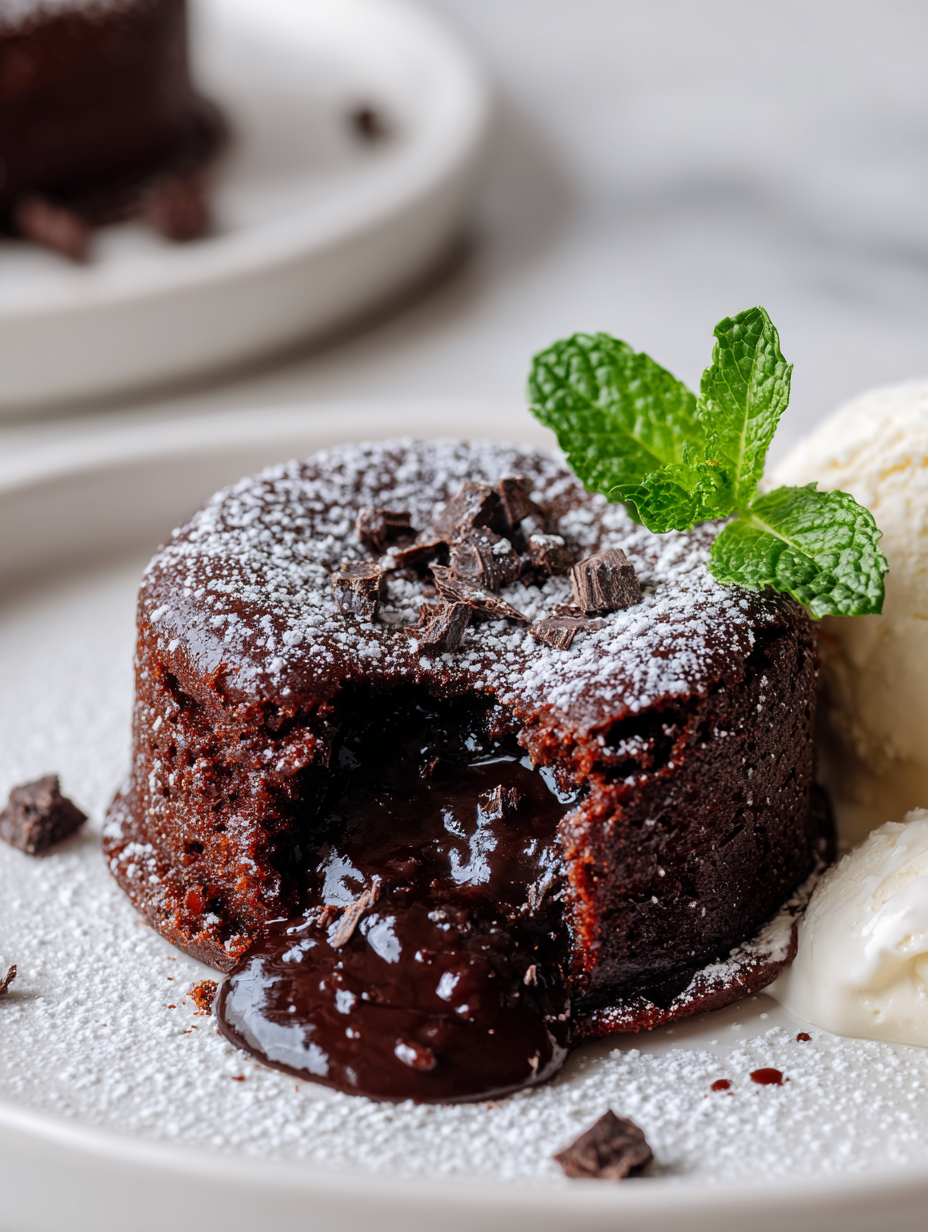
- Serve immediately with a dusting of powdered sugar, a scoop of vanilla ice cream, or fresh berries for contrast.
Let the fondants rest for 1-2 minutes outside the oven. Run a knife around the edges, then invert onto plates. Serve immediately for the best molten center.
How to Know It’s Done
- Edges are firm, center jiggles slightly when shaken.
- Surface cracks slightly but does not crack open entirely.
- When pressed gently, the center feels soft and silky, not hard.
Chocolate Fondant
Ingredients
Equipment
Method
- Preheat your oven to 200°C (390°F). Lightly butter four ramekins and dust them with cocoa powder, tapping out the excess.
- Gently melt the chopped dark chocolate and butter together in a heatproof bowl over simmering water, stirring until smooth and glossy. Remove from heat and let cool slightly, filling your kitchen with a rich chocolate aroma.
- In a separate bowl, whisk the eggs, egg yolks, and caster sugar together until the mixture turns pale, thickens slightly, and you can see a gentle ribbon when you lift the whisk—about 2 minutes.
- Pour the slightly cooled melted chocolate into the egg mixture, folding gently with a spatula until well combined and smooth, filling your kitchen with a decadent chocolate scent.
- Sift the flour and cocoa powder into the bowl, then fold gently until just incorporated, ensuring your batter remains airy and smooth.
- Divide the batter evenly among the prepared ramekins, smoothing the tops with a spatula for an even surface.
- Bake the fondants in the preheated oven for exactly 12-14 minutes. The edges will be set but the center should still jiggle gently when nudged, promising that molten core.
- Once baked, let the fondants rest for 1-2 minutes outside the oven. This brief pause helps the centers settle for easier unmolding.
- Gently run a thin knife around the edges of each ramekin to loosen the sides, then carefully invert onto serving plates—watch as the rich, gooey center flows out in a glossy stream.
- Serve immediately, dusted with a little powdered sugar or alongside a scoop of vanilla ice cream for a perfect indulgence.
Pro tips for perfect fondant
- Use high-quality chocolate for a glossy, intense finish that melts beautifully in your mouth.
- Chill your ramekins before filling — this helps prevent the batter from sticking and ensures even baking.
- Keep an eye on the oven; a minute too long and the center sets, losing that gooey magic.
- Gently tap the ramekin after baking to feel for a slight jiggle—perfectly molten should wobble slightly.
- For a shinier crust, brush the tops lightly with melted butter before baking.
- Slightly underbake if you want that classic flowing center—resist the urge to peek too early.
- Rest the fondants just a minute after baking—they’ll settle and make unmolding easier.
Common Mistakes and Fixes
- FORGOT to adjust baking time for different oven calibrations; check texture early.
- DUMPED batter into hot ramekins; always let chocolate cool slightly to prevent cooking eggs.
- OVER-TORCHED the fondant; remove at first signs of jiggle for molten center.
- UNDER-BAKED produces runny center; bake a minute longer if center is too liquid.
Quick Fixes for Molten Perfection
- When batter is too thick, splash in a little hot water to loosen it.
- If the fondant cracks when unmolding, gently reheat for 10 seconds and try again.
- DUMPED batter into hot ramekins? Chill them first to prevent overcooking edges.
- Over-baked? Crack open a new batch and lower oven temperature slightly for more control.
- Splash a tiny pinch of salt into the chocolate to enhance richness and cut sweetness.
Prep, store, and reheat tips
- You can prepare the batter up to a day in advance; keep it covered in the fridge and give it a gentle stir before baking. The chocolate develops a richer flavor overnight.
- Store baked fondants in an airtight container in the fridge for up to 2 days. Reheat briefly in the oven at 180°C (355°F) for 5-7 minutes until warm and gooey again, with a crackly top and molten center.
- The flavors deepen and the texture becomes more cohesive after resting overnight. However, the center may set slightly if stored too long, so reheat carefully.
- For frozen fondants, wrap tightly in plastic wrap, then foil. Freeze up to 1 month. Thaw overnight in the fridge, then reheat at 180°C (355°F) for about 10 minutes for best gooeyness.
FAQs about Chocolate Fondant
1. What does a perfect chocolate fondant look like?
A gooey, molten center that flows out when you cut into it, rich and velvety, with an intense chocolate aroma.
2. How do I know when it’s baked just right?
It should be firm around the edges, with a slight jiggle in the center, not liquid but very soft.
3. Can I use any chocolate for this recipe?
Use high-quality dark chocolate for that glossy, rich finish. Cheaper chocolates can make it dull or grainy.
4. Can I substitute the dark chocolate?
Yes, but the texture and flavor will change. Semi-sweet or milk chocolate will be sweeter and less intense.
5. What if my fondant is overcooked and not gooey?
Overbaking makes the center set and loses its gooeyness. It’s better to slightly underbake and check early.
6. When should I serve the fondant?
Serve immediately after baking for that perfect molten flow. Reheating makes it softer but can make the edges too firm.
7. How do I reheat leftovers without losing texture?
A quick reheat in a 180°C (355°F) oven for 5 minutes can revive a slightly cooled fondant, restoring some of the gooeyness.
8. Can I make this in advance?
You can prepare the batter a day ahead, keep it chilled, and bake just before serving for fresh molten centers.
9. What if my batter is too thick or too runny?
If the batter is too thick, add a splash of hot water. If too thin, chill it slightly before baking.
10. Any tips for unmolding the fondant cleanly?
Use ramekins that are well-greased and chilled beforehand. Run a knife around the edges to help unmold smoothly.
There’s something about that moment when the molten chocolate flows out—like a secret unlocked in your own kitchen. It’s a dessert that feels indulgent without the fuss, perfect for when you need a little comfort or a surprise for someone special.
In the chaos of everyday life, it’s nice to have a recipe that’s forgiving yet impressive. A warm fondant is a small act of rebellion—simple, rich, and utterly satisfying when served right out of the oven.

Hi, I’m Isabella Cury, the creator behind Elevating Simple. Food has always been my passion, but it’s not just about creating meals—it’s about taking everyday ingredients and transforming them into something extraordinary.
My journey in the culinary world has been a blend of education, dedication, and a deep love for sharing food with others. Through this blog, I aim to inspire people to find joy in simple, flavorful cooking.


